Author: School of IT

Troubleshooting in Proxmox

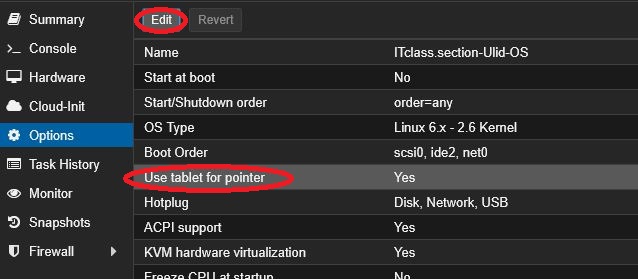
  • Mouse pointer issues
    • If your mouse becomes de-synced, you can perform the following:
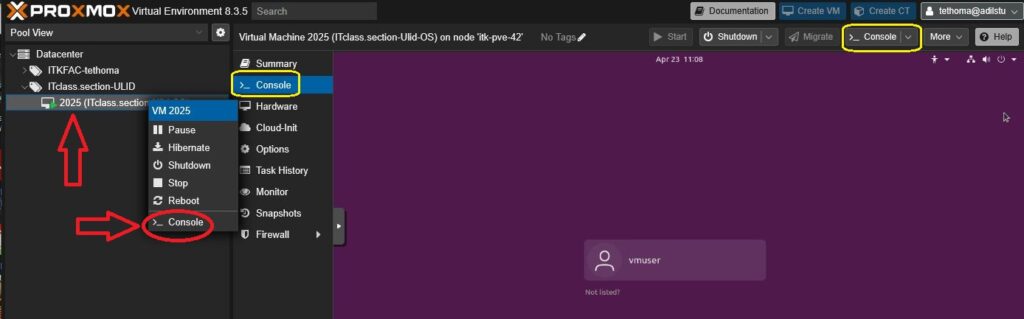
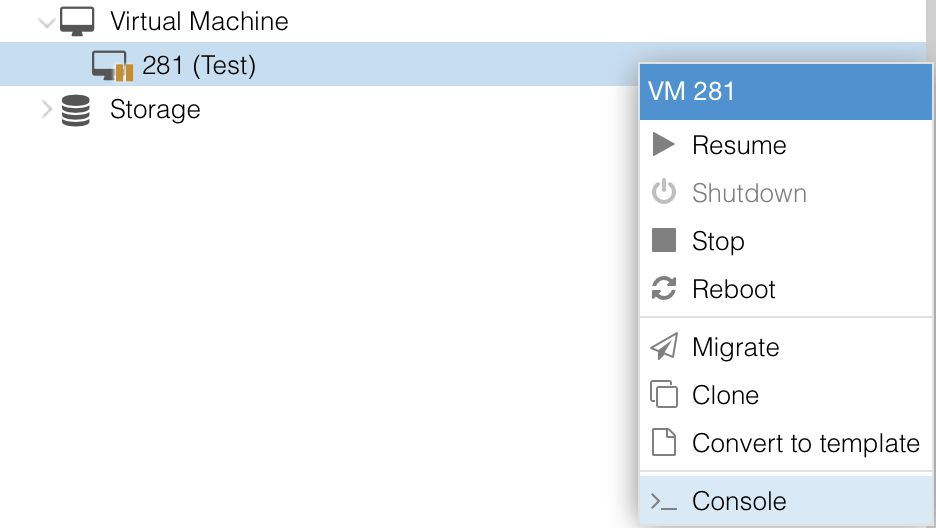
    • Click on your VM, select Options, then “Use tablet for pointer”
      • Click Edit, then uncheck the box, apply
      • Click Edit again, recheck the box, apply
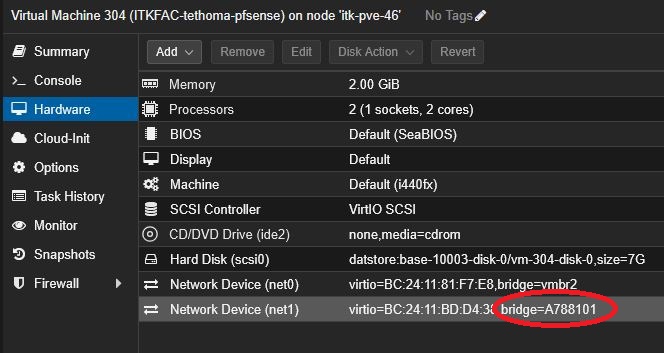
  • No network connectivity on your VM
    • Have you changed any settings on your pfsense VM? If so, it could be miss-configured and that could be the cause of this issue.
      • One way to troubleshoot this is to roll back to the original snapshot of the pfSense VM.  
    • Verify matching networks between your pfsense and VM:
      • The hardware tab network ID is the same between your pfsense and virtual machine LAN network
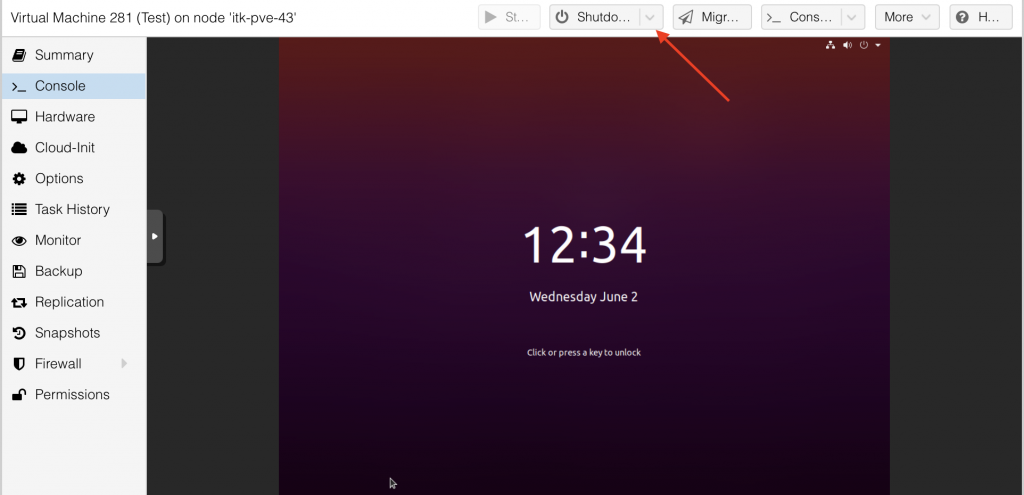
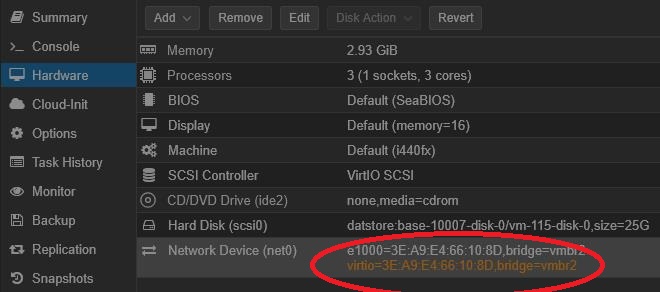
  • If you notice that your network card is highlighted in orange, this means there is a pending hardware change that requires a restart. If you see this, reboot your VM:

If you are still having any issue, please submit a detailed ticket with your class number and section at ithelp.illinoistate.edu.

Connecting to VDI

Connecting via the VMware Horizon Client

Note: VPN is required

  1. Connect to the Cisco AnyConnect VPN client (download here)
    • Please note that this requires 2-factor authentication. The authentication process varies depending on your setup. Please see here for more information.
  2. Download the VMware Horizon Client
  3. Install with default options and the View Connection Server is: “vdi.it.ilstu.edu
  4. Open VMware Horizon View Client
    • Double click on “vdi.it.ilstu.edu”
    • Logon with your ISU ULID and password
    • Double click on the VM-Pool you would like to access
      • ITLab-Pool – General use virtual machines
      • ITPersonal-Pool – Faculty/Staff/GA virtual machines
      • Class Specific VM Pool – your instructor will give you the name

Accessing VDI via the web browser

First connect with the Cisco Anyconnect VPN client, then open a web browser tab and go to vdi.it.ilstu.edu
(recommended if you are using MacOS Catalina)

Rstudio Troubleshooting

When accessing rstudio.it.ilstu.edu – sometimes the profile level settings get corrupted and prevent the ability to run or install packages. To resolve this issue, you will need to run a command that resets your profile back to the default settings.

  1. Click Terminal at the bottom left, and run the command “rm -rf R”  (this will remove all settings for your profile)
  2. Log off at the top right (this will prompt a reload R? question, say yes and let it reload. 

Remote Collaboration

How to use Remote Collaboration mode to view each others sessions (with remote control option) through vdi.it.ilstu.edu

  1. Click the up arrow near the time at the lower right of the VM – and click on the monitor icon

2. Enter the ulid@ilstu.edu of the user you would like to share to, and then click Copy Link

3. Open Office365 Outlook and email the copied link to the ulid@ilstu.edu of the user you would like to share to (Note: this must be another user who is entitled to use this system, i.e. faculty, staff, students of School of IT or CAST)

4. You can give full control and see the status of anyone connected (including disconnect) other sessions the green monitor icon

Here is a video walk through of these steps:

Access a Proxmox VM console

To open a console for your VM:

  1. Right click on your VM. Click on console, it will be at the bottom of the list. If you can access your VM here, you are done! If not, continue to step 2.
    • Alternatively, if you are already on your virtual machine, click console in the menu (highlighted in yellow).
    • You can also just double click your VM.
  1. If your VM does not open and a file is downloaded, please ensure that you have the spice client installed before opening the file.
    • Spice client for windows: Download
    • MacOS does not support spice client, you can use the IT Lab Pool: ITLab-Pool
      • Alternatively, you can request spice to be disabled. Please submit a support ticket at ithelp.ilstu.edu.
    • Debian based Linux: open a console and run: apt-get install virt-manager
  2. Open the downloaded file. You will be able to access your VM here.

How to Snapshot and Rollback

What is a snapshot? When should I use it?

  • A snapshot is a feature that lets you preserve the state of a virtual machine; so you can return to that state when needed. It is important that you have no more than 2 snapshots at any given time, as each snapshot will slow down the storage on this virtual machine.

How to Snapshot on Proxmox

Video Tutorial

Step 1

  • Go to Snapshot

Step 2

  • Shutdown your virtual machine.

Step 3

  • Click take a Snapshot.

Step 4

  • Name your Snapshot.

What is a Rollback

A Rollback returns the virtual machine to its state before you took the Snapshot.

How to Rollback Snapshots on Proxmox

Video Tutorial

Step 1

  • Click on Snapshot.

Step 2

  • Click on desired Snapshot to Rollback.

Step 3

  • Click Rollback.

How to start and shutdown VMs

In Proxmox, there are have multiple ways to utilize Power Commands. But before we discuss the ways to access the commands, I will describe to you the functionality of each individual Power Operation and what it affects.

Hibernate

  • Suspends the OS and enters a sleep state.

Pause

  • Pauses the OS.

Reboot

  • Properly shuts down and restarts the operating system.

Reset

  • Resets the virtual machine abruptly without consideration for your work in progress.

Reload

  • Reloads the virtual machines operating system.

Start

  • Turns on the virtual machine.

Suspend

  • Saves the state of your computer and powers off.

Stop

  • Powers off the virtual machine abruptly with no consideration for work in progress.

Three ways to access power options.

Method 1

  • Right click your virtual machine and you will have access to your power commands.

Method 2

  • Click on your virtual machine.
  • Go to your console to access your virtual environment.
  • Click the side bar
  • Click the power button to access the power commands.

Method 3

  • Click on your virtual machine.
  • Go to your console.
  • Go to the upper right hand corner and you will have access to your power commands.

Logging in to Proxmox

To log in to the School of IT Proxmox Virtual Environment (PVE):

  1. if you are off campus, then you will need to connect to the Cisco AnyConnect VPN client (download here)
    • Please note that this requires 2-factor authentication. The authentication process varies depending on your setup. Please see here for more information.
  2. Go to pve.it.ilstu.edu and select the Proxmox option
  3. At the PVE login screen, verify the realm is set to “adilstu” and enter your ULID and password
  4. Upon successful login, you are notified regarding your access to a restricted system and relevant compliance standards. You can close the notification by selecting “OK” or by clicking the “x” button.

**Optional

Once logged in, switch your view to Pool View by going to the top left drop-down and selecting “Pool View”

Next Page »